.png)
The Legend of Zelda: Tears of the Kingdom – All Faron Shrine Locations and Solutions
- Pedro Hernández

- Jun 18, 2023
- 9 min read

The Legend of Zelda: Tears of the Kingdom features 152 Shrines in total, with 120 located on the Surface and 32 in the Sky. While there are no Shrines in the Depths, you'll find Lightroots there, which serve as fast travel points, similar to Shrines. Each Shrine offers a mini-dungeon filled with puzzles and rewards, including at least one Treasure Chest and a Light of Blessing.
Faron Locations
Utsushok Shrine ( -3807, 2698, 0172)

The Utsushok Shrine ( -3807, 2698, 0172) in The Legend of Zelda: Tears of the Kingdom is one of many shrines that challenge players with puzzles or combat trials to earn Light of Blessing or other rewards. Located in the Hebra region, this shrine features the Proving Grounds: Vehicles challenge, where you must defeat enemies using a variety of Zonai vehicles, which are a central mechanic in Tears of the Kingdom.
Shrine Challenge: Proving Grounds - Vehicles
The main goal in Utsushok Shrine is to defeat all the constructs (enemies) in the area. The shrine is packed with Zonai devices like fans, wheels, and flamethrowers, which you can use to create vehicles or weapons. Here’s a step-by-step strategy:
Survey the Area:
Take a moment to look around and spot the enemies. Note where Zonai devices and materials are placed, as you’ll need to use them creatively.
Build a Combat Vehicle:
There are several Zonai devices around, including fans, wheels, and flamethrowers. You can create different types of vehicles, like:
Flame-chariot: Attach flamethrowers to a platform with wheels or fans. This allows you to drive close to enemies and unleash fire.
Ram vehicle: Attach fans to a simple platform and drive it toward enemies to knock them over.
Tip: Attach fans to increase speed, but make sure to control the vehicle so it doesn’t veer off too wildly.
Using Zonai Weapons:
Scattered around the shrine are Zonai weapons, such as construct bows, spears, and swords. Equip these as needed, especially if you prefer close combat over vehicle combat.
Combat Strategy:
Flamethrowers: If you have a flamethrower-equipped vehicle, stay on the move to hit multiple constructs.
Sneak Attacks: You can use stealth to approach enemies if you prefer a quieter approach. The constructs are less likely to detect you if you stick to the edges.
Using the Environment: Some areas have height differences that you can use for sniping with a bow or evading enemies.
Eliminate All Constructs:
Continue using vehicles or weapons until all constructs are defeated. Don’t forget that if a vehicle is destroyed, you can build a new one using available materials.
Rewards
After defeating all the constructs, a chest will appear. This chest often contains:
A useful Zonai device or weapon.
After claiming the chest, you’ll receive a Light of Blessing, which you can use to upgrade your stamina or health at a Goddess Statue.
Tips for Success
Experiment with Zonai Devices: The vehicles here can be tricky to control, but experimenting with different combinations can make combat easier.
Stay on the Move: Constructs hit hard, so keep moving and use vehicles to evade attacks.
Patience is Key: Take your time to plan your vehicle builds and strategies. Rushing may lead to losing valuable devices and increasing the difficulty.
With these tips, the Utsushok Shrine should be a fun and manageable challenge.
Joju-u-u Shrine (1516, -3576, 0142)

The Joju-u-u Shrine (1516, -3576, 0142) in The Legend of Zelda: Tears of the Kingdom is located in the East Faron region near the southern coast of Hyrule. This shrine, visible from afar due to its high placement on a cliff above the Lakeside Stable, is a convenient fast travel point for the surrounding area. Here’s a guide to help you conquer the Joju-u-u Shrine and earn your rewards.
Shrine Challenge: Building Bridges
The main challenge in Joju-u-u Shrine, called Building Bridges, involves using the Ultrahand ability to connect objects and create pathways. Here’s a step-by-step guide to solving it:
Entering the Shrine: Upon entering, you’ll see that the shrine requires you to create bridges using various wooden planks and platforms provided within the puzzle area.
First Bridge:
Find a set of long wooden planks near the initial platform.
Use Ultrahand to pick up a plank, then position it to bridge the gap to the next platform.
Adjust the angle and alignment carefully to ensure it’s secure, then cross to the other side.
Second Gap:
For the second section, you’ll likely find multiple planks of various lengths.
If one plank isn’t long enough, try attaching two planks end-to-end using Ultrahand to create a longer bridge.
Attach the planks carefully, ensuring they are straight and aligned, so they don’t collapse under Link’s weight.
Cross once your bridge is stable.
Final Challenge – Larger Gap:
The last section might have a wider gap or a more complex layout. Look around for any nearby materials to extend the bridge.
If you need extra support, try building with multiple layers of planks, or secure them by anchoring the ends on raised ground if available.
Carefully cross the final bridge to reach the end of the shrine.
Shrine Rewards
Upon completing the Building Bridges challenge, you’ll receive a chest containing Large Zonaite, a valuable resource for crafting and upgrading Zonai devices.
Tips for Success
Ultrahand Precision: Ensure that each plank is securely in place before crossing, as poorly aligned bridges can collapse.
Experiment with Materials: Don’t hesitate to get creative! If one bridge design fails, try different plank combinations or build support structures.
Watch Your Step: Once you’ve placed the bridge, move cautiously across it to avoid slipping or toppling any unsecured planks.
With this approach, the Joju-u-u Shrine should be a fun and rewarding puzzle to complete, and you’ll be one step closer to mastering the art of Zonai engineering!
Utojis Shrine (1217, -2542, 0096)

The Utojis Shrine (1217, -2542, 0096) in The Legend of Zelda: Tears of the Kingdom presents players with the "A Balanced Plan" challenge. This shrine, located in the Hyrule Field region, is a test of balancing and counterweight mechanics, requiring clever use of the Ultrahand ability to solve puzzles and move through the shrine. Here’s a full guide on how to complete Utojis Shrine and earn its rewards!
Shrine Challenge: A Balanced Plan
The main challenge in Utojis Shrine is balancing platforms and using weights to open pathways and proceed. You’ll need to carefully place and adjust objects using the Ultrahand ability. Here’s a breakdown of the steps:
First Balancing Puzzle:
You’ll see a platform balanced on a central fulcrum with one side raised and the other lowered.
Find a nearby heavy object, such as a stone block or metal weight, and use Ultrahand to lift and place it on the raised side of the platform.
The weight should bring down the raised side, allowing you to cross over to the next area.
Second Puzzle – Multi-Step Balance:
For the second section, you may find two separate platforms, each with weights and raised sides.
Here, you’ll need to use both weights and platforms to balance the setup so you can proceed.
Start by moving one weight onto the first platform to lower it.
Cross to the other side, then move another weight to the second platform to create a path forward.
Some platforms might need two weights, or you may have to adjust by removing one weight and adding it to another platform.
Final Puzzle – Precision Balancing:
The last section requires more precise balancing. You may need to use all available weights to ensure the platform stays even as you walk across.
If there are multiple weights of different sizes, experiment with combinations to balance the platform perfectly.
When the final platform is balanced, cross over to reach the shrine’s altar.
Shrine Rewards
After completing the "A Balanced Plan" challenge in Utojis Shrine, you’ll receive the following rewards:
A chest that often contains a valuable item, like a weapon or Zonai material.
A Light of Blessing, which you can use to upgrade either your stamina or health at a Goddess Statue.
Tips for Success
Use Ultrahand Precisely: Balance platforms carefully, and adjust placements if you see one side tipping too far.
Observe Platform Movements: If a platform tips too quickly, try moving weights more slowly or experimenting with combinations.
Stay Patient and Experiment: Balancing puzzles may take some trial and error, so take your time and try different configurations.
With a little patience and a steady hand, the Utojis Shrine will be a manageable and rewarding experience!
Jiukoum Shrine (0867, -2280, 0141)
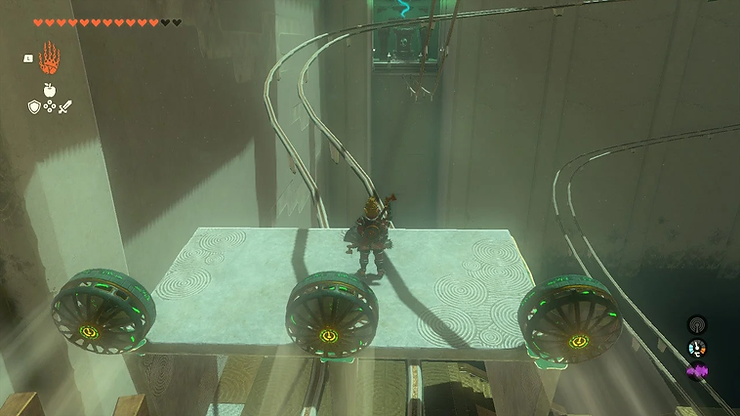
The Jiukoum Shrine (0867, -2280, 0141) in The Legend of Zelda: Tears of the Kingdom is located near the Popla Foothills Skyview Tower in the Faron region. Positioned just east of the tower and visible in plain sight, this shrine offers a unique rail-based puzzle titled "Built for Rails." Here’s how to complete the shrine and earn your Sticky Elixir reward.
Shrine Challenge: Built for Rails
In the Built for Rails challenge, you’ll navigate through the shrine by creating rail carts or using other rail-based mechanisms to move forward. This challenge focuses on creative use of the Ultrahand ability to attach objects and construct carts that travel along rails.
Step-by-Step Guide
First Rail Section:
At the beginning, you’ll see a rail track with some Zonai devices nearby, like wheels or fans.
Use Ultrahand to attach one or more wheels or fans to a platform to create a simple cart.
Position the cart onto the rail, and use the fan to propel it along the track to cross to the next area.
Second Rail Section – Inclined Rails:
In the next area, you might encounter a set of inclined rails, requiring more power to move uphill.
Build a sturdier rail vehicle by attaching multiple fans to the cart. If available, attach fans at an angle that will help push the cart up the incline.
Carefully place the cart on the rail and activate the fans to move uphill.
Third Rail Section – Gaps in the Rails:
The final section may have gaps in the rails, which will require either a longer platform or careful positioning to ensure your cart doesn’t fall off.
For wider gaps, try attaching a longer plank to your cart to bridge these gaps as you cross.
If the gap is too large, use multiple Zonai devices, such as fans and balloons (if available), to lift and guide the cart across.
Final Platform:
After successfully navigating the rail sections, you’ll reach the shrine’s end platform where you can collect your reward.
Shrine Rewards
Upon completing the Built for Rails challenge in Jiukoum Shrine, you’ll receive:
A Sticky Elixir from the chest, which provides increased grip, making it easier to climb slippery surfaces in the rain or on wet cliffs.
Additionally, you’ll earn a Light of Blessing, which can be used at a Goddess Statue to increase your health or stamina.
Tips for Success
Experiment with Zonai Devices: Try different fan placements and numbers to get the speed and balance needed for each rail section.
Align Carefully: Ensure your cart is well-aligned with the rails before activating the fans to avoid derailing.
Adjust for Gaps: Use longer platforms or stabilize the cart when crossing large gaps to prevent falling.
With patience and careful construction, the Jiukoum Shrine can be a fun and innovative puzzle to solve! Enjoy the Sticky Elixir reward as you continue your adventure in Hyrule.
Ishokin Shrine (-0566, -3523, 0129)

The Jiukoum Shrine (0867, -2280, 0141) in The Legend of Zelda: Tears of the Kingdom is located near the Popla Foothills Skyview Tower in the Faron region. Positioned just east of the tower and visible in plain sight, this shrine offers a unique rail-based puzzle titled "Built for Rails." Here’s how to complete the shrine and earn your Sticky Elixir reward.
Shrine Challenge: Built for Rails
In the Built for Rails challenge, you’ll navigate through the shrine by creating rail carts or using other rail-based mechanisms to move forward. This challenge focuses on creative use of the Ultrahand ability to attach objects and construct carts that travel along rails.
Step-by-Step Guide
First Rail Section:
At the beginning, you’ll see a rail track with some Zonai devices nearby, like wheels or fans.
Use Ultrahand to attach one or more wheels or fans to a platform to create a simple cart.
Position the cart onto the rail, and use the fan to propel it along the track to cross to the next area.
Second Rail Section – Inclined Rails:
In the next area, you might encounter a set of inclined rails, requiring more power to move uphill.
Build a sturdier rail vehicle by attaching multiple fans to the cart. If available, attach fans at an angle that will help push the cart up the incline.
Carefully place the cart on the rail and activate the fans to move uphill.
Third Rail Section – Gaps in the Rails:
The final section may have gaps in the rails, which will require either a longer platform or careful positioning to ensure your cart doesn’t fall off.
For wider gaps, try attaching a longer plank to your cart to bridge these gaps as you cross.
If the gap is too large, use multiple Zonai devices, such as fans and balloons (if available), to lift and guide the cart across.
Final Platform:
After successfully navigating the rail sections, you’ll reach the shrine’s end platform where you can collect your reward.
Shrine Rewards
Upon completing the Built for Rails challenge in Jiukoum Shrine, you’ll receive:
A Sticky Elixir from the chest, which provides increased grip, making it easier to climb slippery surfaces in the rain or on wet cliffs.
Additionally, you’ll earn a Light of Blessing, which can be used at a Goddess Statue to increase your health or stamina.
Tips for Success
Experiment with Zonai Devices: Try different fan placements and numbers to get the speed and balance needed for each rail section.
Align Carefully: Ensure your cart is well-aligned with the rails before activating the fans to avoid derailing.
Adjust for Gaps: Use longer platforms or stabilize the cart when crossing large gaps to prevent falling.
With patience and careful construction, the Jiukoum Shrine can be a fun and innovative puzzle to solve! Enjoy the Sticky Elixir reward as you continue your adventure in Hyrule.


Comments