.png)
Hogwart's Legacy: All Revelio Page Locations
- Jo Squibbs

- Apr 5, 2023
- 45 min read
Updated: Oct 15, 2024

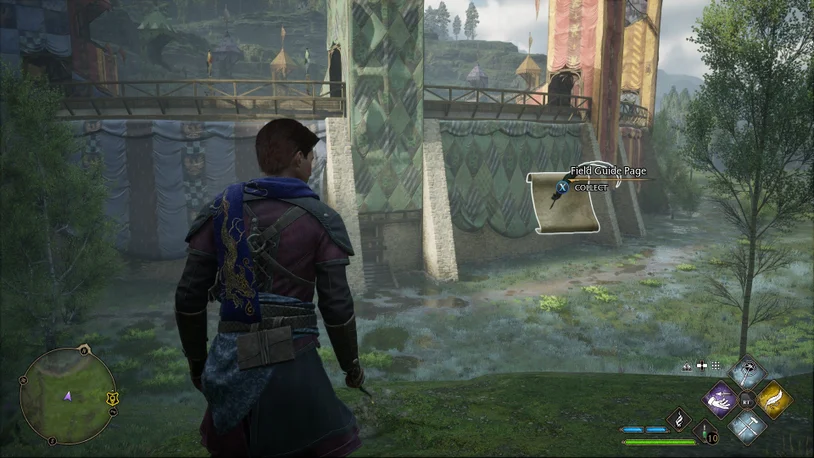
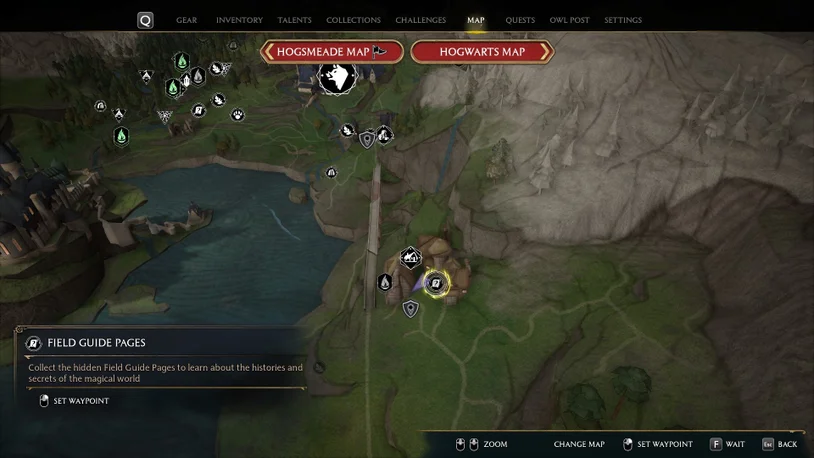
Revelio Pages in Hogwarts Legacy are special Field Guide Pages that must be revealed using the Revelio spell. To discover them, aim the spell at significant objects in the environment. If you’re nearby but not quite close enough, you’ll notice the outline of a Revelio Page and hear a chime. Move closer to the indicated spot, cast the spell, and the page will become visible. Once revealed, you can collect it to view an image and read its description.
Hogsmeade
The Three Broomsticks

The Three Broomsticks, currently managed by Sirona Ryan, is a historic establishment said to be as old as Hogsmeade itself. It serves as a popular meeting place for both villagers and Hogwarts students. Located near the center of Hogsmeade, it can be reached by following the main road from the southern entrance up to where the road splits. Inside the tavern, use the Revelio spell near the fireplace to uncover a Field Guide Page.

Three Broomsticks Private Room

Head to the Three Broomsticks pub, located in the heart of Hogsmeade along the main street. Once inside, ascend the narrow staircases to reach the top floor, where you’ll encounter a Level 1 locked door. To unlock it, use the Alohomora spell, which becomes available after progressing past *The First Trial* in the main story and completing Mr. Moon's quest.

In the top-floor room, you'll find a trove of treasures, including a Revelio Page, a Demiguise Statue, and a Conjuration Recipe Collection Chest.
Butterbeer Barrels

These barrels hold the popular wizarding beverage, Butterbeer. They are located outside on the north side of the Three Broomsticks building, directly across from the entrance to Zonko's, near the center of Hogsmeade.

Ceridwen's Precarious Cauldrons

The precariously stacked cauldrons outside Ceridwen's serve as an advertisement for the shop's products. You'll spot them easily when entering Hogsmeade from the southern bridge entrance; as you start down the main street, the cauldrons and Field Guide Page will be on your right.

Sneakoscope

A Sneakoscope, a type of Dark Detector, reacts to the presence of untrustworthy individuals by spinning, whistling, and lighting up. You can find one inside the Dervish and Banges shop, which shares space with Gladrags on the west side of the North Hogsmeade Floo Flame and village square. Look for it on a table near the entrance door.

The Dogweed and Deathcap Tree

This large tree with twisting branches provides support for the shop Dogweed and Deathcap. You can find this establishment on the northeastern edge of Hogsmeade Village, across the river, accessible by taking the bridge from Hogsmeade Square.

Hogsmeade Community Garden

This quaint community garden, located in the heart of the village, is ideal for cultivating a variety of herbs and magical plants. You can find it just across the small road from the West Hogsmeade Floo Flame. Head east down some stairs on a slight incline behind a row of houses, where the garden has flourished.

Gladrags Mannequin

In contrast to the enchanted mannequins that students use for dueling practice, the mannequins at Gladrags are solely for showcasing the latest wizarding fashion. You can find this Revelio Page inside the Gladrags store, situated by the North Hogsmeade Floo Flame, among the western buildings. The specific mannequin you're looking for is positioned right by the front door.

Gladrags Wizardwear

Established in 1750, Gladrags provides a wide range of wizarding clothing and accessories. You can locate the building near the village square, adjacent to the North Hogsmeade Floo Flame, on the west side of the square by a large archway. The Revelio Page can be found out front.

Hog's Head Docks

The docks outside the Hog's Head Inn provide a lovely spot to sit and unwind. You can find them on the opposite side of the inn, along the waterfront near the West Hogsmeade Floo Flame. The Revelio Page is hidden near a large cask and some crates.

Mounted Hog's Head

This mounted hog's head rolls its eyes and snuffles its nose while watching over the shady ambiance of the Hog's Head pub. You can find the establishment near the West Hogsmeade Floo Flame, just down the back alley roads. Once you step inside, the titular head is mounted right behind the front counter.

Exploding Bonbons

These treats explode when consumed, and while they are unlikely to cause serious injury, it's advisable to chew carefully. You can locate this Field Guide Page inside Honeydukes Sweet Shop, situated on the far east side of town near the North Hogsmeade Floo Flame. Once inside, proceed to the back of the shop, where you'll find a large Niffler statue, to discover the page.

Honeydukes

Honeydukes Sweet Shop offers a wide selection of magical treats, including Fizzing Whizzbees, Exploding Bonbons, and more. This spacious shop is easy to locate, situated on the far east side of Hogsmeade next to the North Hogsmeade Floo Flame.

Fizzing Whizzbees

These delightful sweets, rumored to contain Billywig stings, are small sherbet balls that will lift you a few inches off the ground when eaten. You can find this Field Guide Page as you enter the Honeydukes Sweet Shop on the east side of Hogsmeade, next to the North Floo Flame.

The Magic Neep Cart

This cart is owned by Timothy Teasdale, who operates The Magic Neep. You can locate this shop on the northwestern outskirts of Hogsmeade by crossing the bridge from the West Hogsmeade Floo Flame to the garden shop. The page can be found to the left of the merchant.

Abandoned Shop

The owner of this abandoned shop is rumored to have used a Shrinking Charm to help store their inventory, but a slight miscalculation may have caused it to vanish completely. This shop, known as The Old Fool, is situated in the far northern edge of Hogsmeade, across the river and northeast of The Magic Neep. Inside, you’ll find the Field Guide Page located right next to the shop owner and her counter.

Ollivanders Wand Shop

In this cozy, cluttered shop run by Gerbold Ollivander, wands made from various woods and differing levels of flexibility, each containing one of three magical cores, choose their owners. You can find the shop by entering Hogsmeade from the southern bridge entrance, heading down the main street, and looking to the left when the road forks.

J Pippin's Potions

Founded in 1753, J. Pippin's Potions serves as the apothecary in Hogwarts, where the proprietor offers a wide range of potions and ingredients. You can locate it in western Hogsmeade, directly across from the West Hogsmeade Floo Flame. Inside the shop, you’ll find the Field Page located by the potions desk.

Hengist of Woodcroft

TThis statue depicts Hengist of Woodcroft, a Hufflepuff believed to be the founder of Hogsmeade, who was driven from his home by Muggle persecutors. You can find the statue at the very center of Hogsmeade Square, situated near the North Hogsmeade Floo Flame.

Magical Mail

Home to over 200 owls, this post office sorts its residents by color and species based on the speed required for delivery. You can find this tall building in the center of Hogsmeade Square on the south side, directly across from the statue by the large tree. Inside, the Field Guide Page is nestled among the parcels.

Scrivenshaft Cats

These cats appear to linger around Scrivenshaft's Quill Shop, possibly drawn by the feather quills or the owner's treats. You can find this Field Guide Page inside the shop, which is located in Hogsmeade Central Square near the North Hogsmeade Floo Flame.

Spintwitches Sporting Needs

Managed by the friendly Albie Weeks, this shop offers a wide range of wizarding sporting goods, including the latest broom models and possibly even broom enchantments. The shop will only become accessible after you complete your first flying lessons at Hogwarts by progressing through the main story in the *Flying Class* quest. Once it opens, you can enter to find the Revelio Page located by a sports uniform.

Tea Shop Decor

Reflecting the taste of proprietor Mrs. Steepley, this tea shop is filled with pink decor and frills. Located on the southeastern edge of North Hogsmeade Central Square, it sits next to the Honeydukes Sweet Shop. As you enter the first floor of the tea shop, you can find the Field Guide Page to the left.

Enchanted Staircase

This enchanted staircase in Tomes and Scrolls appears when a specific book is moved. You can find it inside the Tomes and Scrolls shop, located along the main street as you enter Hogsmeade from the southern bridge; it will be on your left. You can also activate the staircase by touching a book positioned opposite the bookshelf.

Brood and Peck

Proprietor Ellie Peck is a passionate advocate for beasts and offers fair prices for any creatures in need of a safe home. This shop is also the go-to place for beast byproducts, such as Fwooper feathers and Niffler fur.

Similar to the Broom Shop, this Field Guide Page only becomes accessible after you've progressed far enough in the main story to learn about Magical Beast Care. Specifically, after completing the quest *The Elf, The Nab-Sack, and the Loom,* Deek will inform you that you can purchase products at the Brood and Peck store in Hogsmeade, which will then be open. You can find the store on the northeast side of Hogsmeade, near the pond and closest to the northernmost bridge leading out of the village. The Field Guide Page is located inside the shop.
Hogsmeade

As the only all-wizarding village in Britain, Hogsmeade has been a favorite destination for Hogwarts students for centuries. You can find this initial Field Guide Page as you approach the Hogsmeade bridge, positioned at the base of a lamp post just to the left of the bridge.

Water Well

A savvy traveler understands that some water wells may hold more secrets than this seemingly ordinary one in Hogsmeade. You can find it along the upper main road, near the center of the village, just north of the Three Broomsticks and Zonko's Joke Shop, in a small courtyard situated below Madam Snelling's Emporium.

Dungbomb

A favorite among pranksters, the Dungbomb emits a noxious odor that drives anyone nearby to flee. You can find this Field Guide Page on the second floor of Zonko's Joke Shop, near the east door that leads out to the sloped street.

Frog Spawn Soap

An amphibious surprise awaits anyone who attempts to wash with this tadpole-filled bar of soap. You can find it inside Zonko's Joke Shop, located in the center of Hogsmeade. To locate the Field Guide Page, turn left as you enter the shop and look near the front counter.

Zonko's Joke Shop

Popular among both Hogwarts students and villagers, Zonko's is the go-to spot for pranks and jokes in Hogsmeade. You can find the Field Guide Page at its entrance, located in the center of Hogsmeade, just north of the Three Broomsticks.

Chocolate Frogs

Although it is located quite near Hogsmeade, this page is categorized as part of the Highlands pages. Likely left behind by a Hogwarts student visiting Hogsmeade, these enchanted confections hop around like real frogs. You can find it on a bench in a park at the far southeast corner of the Hogsmeade Village area.

Though technically categorized as a Hogsmeade Valley collectible, you can find this page more easily within the village itself. After crossing the bridge into Hogsmeade from the south, take a right, then turn right again to locate the park with a balcony that overlooks the valley below. The page and some chocolate can be found on a bench there.
Hogwarts Castle
Astronomy Wing: Tapestry of Barnabas the Barmy

This tapestry illustrates Barnabas the Barmy’s foolish attempts to teach trolls the art of ballet. You can find it near the very top of the Defense Against the Dark Arts Tower, one floor up from the Charms Classroom Floo Flame, along a short hallway that leads to additional stairs up to the Astronomy Tower.
Astronomy Wing: Astronomy Telescope

This telescope is the finest stargazing instrument of its kind. It is located at the very top of the Astronomy Wing, above the Defense Against the Dark Arts Tower. To reach it, take the staircases up past all the classrooms, continuing even further above the Astronomy Classroom and Floo Flame to the balconies above.
Astronomy Wing: Partial Transfiguration

This partially Transfigured teacup serves as a cautionary tale for students who do not take magic seriously. You can find it on the left side of the Transfiguration classroom, through the door located south of the Transfiguration Courtyard Floo Flame.
South Wing: Portrait of Baruffio

This portrait features the wizard Baruffio with a large buffalo on his chest. If you chose Gryffindor as your house, this will be the first Field Guide Page you acquire with Ms. Weasley. If you selected a different house, you can find it by heading to the Faculty Tower Floo Flame in the South Wing, walking south toward the spiral staircase, and looking to the right to spot the painting.
Bell Tower Wing: Broken Broom

This broken broom once belonged to Selene Wartnaby and is said to be all that remains after she demonstrated an experimental Lunar Apparition Charm. Like the Flattened Armor, it can be found on the main floor of the Belltower Room, across from the Belltower Courtyard Floo Flame, flanking the large doors that lead out into the courtyard.
Tower Wing: Flattened Armour

This set of armor belonged to Sir Scagglethorpe the Heedless and can be found on the main floor of the Belltower Room, across from the Floo Flame. It flanks the large doors that lead out into the courtyard.
Tower Wing: Goblin Artefact

This horn, used by goblins during the 1612 Goblin Rebellion to rally troops and annoy witches and wizards, can be found in a display case above two halberds. It is located on an upper walkway in the Belltower Room, accessible by climbing the stairs south of the Floo Flame.
Tower Wing: Three Sisters Bells

The Three Sisters Bells are believed to be a tribute to the three steep ridges that rise over a glen in Argyllshire. You can find them on display behind a case on the main floor of the Belltower Room, located right next to the Floo Flame.
Tower Wing: Scorch Marks

Allegedly the site of the first known instance of the Bombarda spell being cast, these markings can be found on a wall in the southeast upper corner of the Belltower Room, above the Floo Flame. They are located among a row of musical paintings across from the Goblin Artefact.
Tower Wing: Grimbald Weft

To begin the History of Magic Class side quest, you must first complete Niamh Fitzgerald's Trial in the Bell Tower Courtyard located in the Bell Tower Wing. Once that is done, simply attend the class, and Professor Binns will instruct you to locate the Field Guide Page for Grimbald Weft. You can find the Revelio Page near the Christmas tree in the hall with the knight statues. Cast Revelio to make it appear.
Tower Wing: Frog Choir

The Hogwarts Frog Choir is composed of a perch of slimy yet melodious frogs. They can be found in a musical room situated high up in the Belltower, which you can access by taking the long stairs in the south corner of the room or by ascending the stairs in the adjacent North Hall.
Tower Wing: Waving Knight

As part of the *History of Magic Class* side quest, Professor Binns will ask you to retrieve a second hidden Field Guide Page, this time for Sir Affpuddle. The "Waving Knight" page can be found on the northern end of the building, in front of the left-most knight statue, which, as the name suggests, waves at you. Note that this page is not tracked by the game as part of the Hogwarts 150.

Tower Wing: History of Magic Windows

This set of stained-glass windows depicts Merlin, the four Hogwarts founders, and various notable figures throughout the ages. You can find it in the History of Magic classroom, which is accessible via the North Hall in the Belltower Wing. To reach the classroom, you can travel south from the Belltower Floo Flame or west from the Transfiguration Courtyard.
Tower Wing: Wooden Cat

A wooden statue bearing the likeness of Pangur Donn, a fearless feline mouse hunter and devoted study companion. The statue can be found on an upper walkway in the Belltower Hall by a door to the North leading to the Library Annex Hall.
Great Hall: Black Lake
Locate this page in the same area as the Boathouse Dragon Brazier page mentioned earlier. The Black Lake, also known as the Great Lake, is a large body of freshwater situated south of the castle, and its murky depths are inhabited by merpeople, Grindylows, and various other magical creatures. To find this page, you will need to make your way to the boathouse located far below the Great Hall.

After your first visit to Hogsmeade, the gate to the boathouse will be unlocked in the northeast part of the Viaduct Courtyard. From there, you can take the long, winding path down to the boathouse, where the page will be located next to a docked boat.
Great Hall: Underground Harbour
Situated deep beneath the Viaduct Courtyard is the landing area for boats that transport first-year students across the Black Lake to Hogwarts. To find this Field Guide Page, you must locate a secret lift that descends to the harbor, which will become accessible after your initial visit to Hogsmeade.

From the Viaduct Courtyard Floo Flame, head north along the lower walkway, passing a tree as you look along the stone walls for a doorway leading to a small lift elevator. Take the lift down to the Underground Harbour, and then inspect one of the boats on the far right of the dock to find the page.
Library Annex: Arithmancy Classroom
This classroom is dedicated to teaching students about the magical properties of numbers and numerology. To access it, you'll need to solve an Arithmancy Door puzzle. Begin by heading up the northern spiral staircase in the Viaduct Entrance to the Divination Floo Flame, then exit onto the wooden walkway.

Continue along the walkway to discover one of the many Arithmancy Doors scattered throughout Hogwarts. This particular door has a chest beside it containing the cipher. To solve the puzzle, refer to the numbers associated with the magical creatures by interacting with the ? and ?? blocks on the wall. Your goal is to make the numbers equal the circled number in the center section.

Once the door is unlocked, proceed down the hall into the Arithmancy Classroom to locate the Field Guide Page.
Library Annex Field: Central Hall Fountain

This ornate fountain boasts intricately carved statues representing various magical creatures. You can easily find it after using the Central Hall Floo Flame with Ms. Weasley, as it is prominently displayed in the center of the large, bustling room.
South Wing Field: Clock Mechanics
Although the moving gears of the clock tower's inner mechanics may deter many, others are drawn to the privacy offered by the cogs and wheels. You can find this area at the top of the Clock Tower in the South Wing, accessible after you've learned the Alohomora spell from Mr. Moon following the completion of The First Trial main quest.

After you've learned the Alohomora spell, you can reach the Clock Tower by either climbing up from the locked bottom door in the Clock Tower Courtyard or heading to the top of the Faculty Tower. From there, cross the hall to the top floor of the Clock Tower and descend a few levels to locate the main gears, where you can reveal the Field Guide Page.
South Wing: The Well of Four Beasts
Some students believe that a wish made over the Well of Four Beasts will come true for those who have earned their trust. This location becomes accessible after you've visited Hogsmeade for the first time and are permitted to leave the school. From there, exit the Clockwork Courtyard Floo Flame through the large gate to find the well outside.

South Wing: Haunted Toilets

This bathroom is one of Peeves's favorite spots for pranks. You can find it on the ground floor of Gryffindor Tower in the South Wing. To get there, head north from the Clocktower Courtyard Floo Flame, go down the stairs past the giant map, and take a left to locate the bathroom hall.
Astronomy Wing: Augurey Skeleton

You can find the skeleton of an Irish phoenix, or Augurey, in a large display case within the Defence Against the Dark Arts Tower. It is situated on the same floor as the classroom, located on the west side, beyond the stairs and near the musical instruments.
Astronomy Wing: Boggart Closet
This ancient cupboard is rumored to have once housed a formidable Boggart that even five professors struggled to repel, as it transformed into a werewolf, a tornado, a plate of haggis, a Hungarian Horntail, and someone’s mother-in-law. You can locate it in the Defence Against the Dark Arts Tower, but you must collect enough Demiguise Moons to earn Rank 2 of the Alohomora Spell to access it.

The cupboard containing the Boggart is located on the ground floor of the Defence Against the Dark Arts Tower, next to a level 2 locked door guarded by a chatty gargoyle. Once you unlock this door, you'll find the cupboard in the far corner of the storage room, close to a Collection Chest that holds a wand handle.
Astronomy Wing: Dark Tower Cell

The cell where a troll was reportedly kept for students to practice spells is located in the Defence Against the Dark Arts Tower, near the Charms Classroom. To access this area, you'll need to collect enough Demiguise Moons to unlock Rank 2 of the Alohomora spell. Once you have the spell, head up to the higher levels of the tower, and you’ll find the cell where the troll was housed.

In the Charms Classroom, find a small staircase that leads to a level 1 locked door to Professor Ronen's Office. After entering, ascend the next spiral staircase to reach a rooftop area. There, you will discover a level 2 locked cell door, which holds several chests along with the hidden Revelio Page inside.
Astronomy Wing: Hebridean Black Skeleton

This enormous dragon skeleton suspended in the Defence Against the Dark Arts classroom is said to be a trophy claimed by Professor Hecat following her defeat of a poaching ring. To access it, you must first complete your initial Defence Against the Dark Arts lesson with Professor Hecat. Once that's done, you can find the page located on the low balcony.
Astronomy Wing: Painting of Illyius

This painting features the young orphan wizard Illyius alongside his mouse Patronus. You can locate it on a wall near the stairs at the base of the Defence Against the Dark Arts Tower, situated just southwest of the Transfiguration Courtyard Floo Flame.
Astronomy Wing: Serpentine Beast Window

A stained glass window showcases a serpentine beast entwined around a tree, emerging from the mouth of the legendary Green Man. You can find this window on the second floor of the Defence Against the Dark Arts Tower, near a skeleton display. To reach it, head down the stairs from the classroom Floo Flame.
Library Annex Field: Professor Sharp’s Auror Badge

This Auror badge, belonging to Professor Sharp, symbolizes the Ministry's commitment to magical law enforcement and protection against Dark Magic. You can find it on a table at the back of the Potions Classroom, which is easily accessible via the Floo Flame, located off to the side of the Central Hall.
Library Annex: Gorgon Portrait

An oil painting depicting a stunning gorgon and her suitor, who wisely averts his gaze while bending down to kiss her hand, can be found in the Long Gallery. This lengthy hallway connects two locked doors: one situated beneath the Potions Classroom in the Library Annex and the other located just beyond the giant doors at the Bell Tower Courtyard Floo Flame.

Upon entering the Long Gallery, turn your attention to the side of the door leading to the Bell Tower, where you’ll find an Arithmancy Puzzle Door. To unlock it, use the clues associated with the numbers 0-9 corresponding to the animal symbols on the ? and ?? blocks, solving the equations to input (2) and (1) on the respective blocks. Once the door opens, you’ll discover the Gorgon painting from Greece inside, allowing you to reveal the Field Guide Page. Just be cautious when interacting with it, as it has the power to petrify you!
Bell Tower Wing: Urn of Ashes

This urn, said to have once belonged to a trailblazer in the art of dragon taming, is located in a display area at the entrance to the Bell Tower Wing's dungeons. To find it, head south from the Bell Tower Courtyard Floo Flame, then descend the stairs in the North Hall to reach the dungeons.
Grand Staircase: Salazar Slytherin’s Scriptorium
After completing the In The Shadow of The Study quest and unlocking the entrance to Slytherin’s Scriptorium, you can find the final Field Guide Page needed to complete your Grand Staircase collection. To reach it, navigate to the Lower Grand Staircase section and enter the Scriptorium from the Slytherin Dungeon through the secret passage.

Proceed into the room where you previously discovered Slytherin's spellbook, then cast Revelio at the center of the space. The Salazar Slytherin’s Scriptorium Field Guide Page will materialize just above the carpet.
South Wing: Map of Argyllshire

This expansive map showcases Argyllshire, a region in Scotland known for its black dragons. You can locate it on the first floor of Gryffindor Tower in the South Wing, just across the small bridge to the north of the Clocktower Courtyard Floo Flame.
South Wing: Boris the Bewildered

This statue, known as Boris the Bewildered, depicts a lost-looking wizard and has puzzled students for generations. You can find it at the top of the Faculty Tower within the Hospital Wing, which is accessed from the South Wing of the Grand Staircase. To reach it, you'll need to unlock the Alohomora spell, obtained after completing The First Trial quest. Once you complete Mr. Moon’s quest and gain access to the Faculty Tower, ascend to the very top of the staircase, where the statue awaits on the landing near the Prefect’s Bathroom. Be sure to use Revelio to reveal its significance.
South Wing: Lachlan the Lanky

This statue represents Lachlan the Lanky, a tall and slender wizard who seems quite proud of himself. You can find it at the base of the Gryffindor Tower entrance, situated just north across the bridge from the Clocktower Courtyard. Look for it down the stairs in an alcove, just below the Map of Argyllshire.
South Wing: Adventure Novel Set
If you've unlocked the Alohomora spell, you can access the Adventure Novel Set page. Start by heading to the Faculty Tower in the South Wing. Once there, proceed down the hallway to your right and make another right turn. Open the first door to enter the Faculty Tower stairwell, and you'll find the page inside.

Ascend the stairs until you reach the first locked door on your right. This door will lead you to the area where the Adventure Novel Set page is located.

Use Alohomora to unlock the Level 1 door and enter the final room adorned with tapestries and an astronomical globe. Once inside, cast Revelio on the twin books located on the lower shelf to reveal the hidden page.

Upon revealing the page, you will obtain the Adventure Novel Set Field Guide Page, which describes a collection of old, slightly worn serialized adventure novels that might have been gifted by Professor Onai or her daughter, Natsai.
South Wing: Prefect’s Bathroom
The Prefect’s Bathroom boasts a luxurious, swimming-pool-sized bathtub filled with enchanted soap and vibrant bubbles. It is located at the very top of the Faculty Tower in the Hospital Wing, accessible from the South Wing of the Grand Staircase. To reach it, you must first unlock the Alohomora spell, which allows you to bypass locked doors. This spell can be acquired after completing The First Trial quest.

After completing Mr. Moon’s quest and gaining access to the Faculty Tower, ascend to the very top of the staircase where you'll find a landing adorned with two statues. From there, enter the door opposite the hallway leading to the Clock Tower. Inside, you’ll discover the Prefect’s Bathroom, where a mermaid painting conceals the Field Guide Page.
Grand Staircase: Honeydukes Passageway

Hidden behind the statue of a one-eyed witch is a secret passageway from Hogwarts to the cellar of Honeydukes. You can find it right next to the Faculty Tower Floo Flame that borders the South Wing and Grand Staircase.
South Wing: Jewel-Encrusted Tortoise Shell

Often mistaken for the shell of a Fire Crab, this artifact is said to have been crafted by a mad wizard near Versailles and later stolen by Nifflers. You can find it at the top of the stairwell in the Faculty Tower off the Grand Staircase. First, you’ll need to unlock the Alohomora spell to open locked doors, which you can acquire after completing The First Trial quest. Once you've completed Mr. Moon’s quest and gained access to the Faculty Tower, ascend to the third floor and search behind a display case near a locked door to locate the shell.
Grand Staircase: Quill of Acceptance and Book of Admittance

You may already be aware, especially if you've gathered the Field Guide Pages in the Headmaster's Office, that after completing Niamh Fitzgerald's Trial main quest, you'll gain access to this office situated above the Trophy Room. Upon entering the Headmaster's Office, locate the door next to the desk with a telescope. Use the Alohomora spell to unlock the level 2 lock and proceed up the staircase. Once you reach the top, you'll find another locked door, this one requiring a level 3 unlock.

Upon opening the door, you'll find a room containing the Key of Admittance on the desk. Pick it up and then head back to the Headmaster's Office. From there, descend the spiral staircase until you reach the hallway.

Proceed down the hallway until you reach a large metal door featuring a keyhole in the center. Use the Key of Admittance to unlock it and step inside.

Upon opening the door, you'll discover a sizable wooden loot chest alongside a spiral staircase. Ascend the staircase to find two Collection Chests and the Field Guide Page for the Quill of Acceptance and the Book of Admittance.
Grand Staircase: Centaur Armour

This distinctive set of armor was crafted as a misguided peace offering to a centaur leader and is located at the top of the Grand Staircase, positioned along the outer edge of the Trophy Room behind a large glass case. While you're in the vicinity, don't forget to grab the next Field Guide Page located near the House-Elf Armor, just a few feet away.
Grand Staircase: Moving Staircase

A clever student should be alert to the shifting stairs, which can change position unexpectedly. This Field Guide Page can be located along a balcony on the central pillar, situated halfway up the Grand Staircase, past the entrance to Ravenclaw Tower and just before the Arithmancy Door.
Grand Staircase: Headmaster’s Office Gargoyle

The staircase leading to the Headmaster's office is protected by an enchanted gargoyle that grants access only to those who know the password. This staircase is located at the top of the Grand Staircase Tower, beyond the Trophy Room Floo Flame. However, you must first obtain the Alohomora spell to unlock the level 1 gate at the end of the room.

After unlocking the gate, make your way up through the winding passages, and don’t forget to grab the Legendary Chest located through the first door on your left. Continue climbing more staircases, passing several locked doors until you reach a landing where a giant gargoyle sits on the left, adjacent to a Moth Frame painting.
Grand Staircase: Goblet of Fire Casket

The Goblet of Fire is housed within an ancient, jewel-encrusted chest located in the central Trophy Room. You can find this Field Guide Page just past the Floo Flame at the top of the Grand Staircase, situated prominently in the center of the room alongside the Trophy Room Guide Page.
Grand Staircase: House-Elf Armour

This set of armor designed for a house-elf is said to have been crafted by a cruel wizard who intended for his elf to serve as a protector in battle. You can find it at the far edge of the Trophy Room, located at the top of the Grand Staircase, near a locked door. This page is situated close to the Trophy Room, which contains the next hidden Field Guide Page.
Grand Staircase: Sleeping Portraits
Once you've completed the Niamh Fitzgerald's Trial main quest, you can access the Headmaster's Office to find the next hidden page. After learning the password, you'll be able to bypass the statue guarding the entrance and ascend the spiral staircase to continue your search.

At the top, position yourself in front of the wooden bench inside the ante room of the Headmaster's Office. Cast Revelio, and the secret of the Sleeping Portraits will be unveiled. Proceed into the office for the next page if you haven't collected it yet.

Grand Staircase: The Sorting Hat
Inside the Headmaster's Office, accessible after completing Niamh Fitzgerald's Trial main mission, locate the desk with a glass case housing the Sorting Hat. This is situated on the southwest side of the room, near the metal globe, as you enter.

Cast Revelio to unveil The Sorting Hat Guide Page, which details the hat's rich history and its unique power of Legilimency—the ability to "see" into the wearer's mind, enabling it to assess their thoughts and abilities.
Grand Staircase: Troll Armour

This peculiar suit of armor, designed specifically for a troll, is situated at the entrance of the Trophy Room at the top of the Grand Staircase. You’ll find it directly across from the Trophy Room Floo Flame, and its enormous size makes it impossible to overlook.
Grand Staircase: Trophy Room

This room showcases the House Cup, Quidditch trophies, dueling trophies, and various other awards presented at the school. The Field Guide Page is located near the center of the main Trophy Room, positioned at the top of the Grand Staircase, just beyond the Floo Flame.
Grand Staircase: The Hogwarts Architect
A statue of the Hogwarts Architect, encircled by the four house mascots, is located in the Reception Hall. This hall sits between the Entrance and Great Hall, leading towards the Grand Staircase and is in close proximity to the Hufflepuff common room stairwell.

Great Hall: The Great Hall Ceiling
The Great Hall's ceiling is enchanted to replicate the sky above the castle. You can discover this guide page located in the center of the Great Hall, just a short distance from the Floo Flame.

Great Hall: The Yawning Gargoyle
The smoke-breathing gargoyle, which doubles as the Hufflepuff common room chimney, can be found just outside the Great Hall dining area's doors to the west, in a small courtyard. Though it may seem enchanted, it's a cleverly disguised part of the common room's ventilation.

Cast Revelio to reveal The Yawning Gargoyle Field Guide Page. Before leaving, look up to find another Field Guide Page directly above your head.
Great Hall: Hogwarts Crest

The Hogwarts coat of arms, featuring a lion, snake, eagle, and badger for each house, is prominently displayed in the Entrance Hall. You can find it upon entering from the Viaduct Courtyard Floo Flame to the East, or heading North from the Great Hall Floo Flame.
Great Hall: House Point Hourglasses

The large, ornate hourglasses, filled with rubies, diamonds, emeralds, and sapphires, magically track the house points for Gryffindor, Hufflepuff, Slytherin, and Ravenclaw. You can find them in the Reception Hall, across from the statue of the Hogwarts Architect, located between the Entrance and the Great Hall, leading toward the Grand Staircase.
Great Hall: Owl Lectern

The enchanted lectern, used by the headmistresses and headmasters of Hogwarts to address the school, is located at the far end of the Great Hall, opposite the entrance and near the Floo Flame for quick travel.
Library Annex: Greenhouse Tree

This giant tree, located at the center of a Hogwarts greenhouse, has an extensive root system that extends down to the dungeons. It can be found next to the Greenhouses Floo Flame, situated northeast of the Central Hall.
Library Annex: Dirigible Plums

This orange, radish-like fruit grows upside-down from its tree, which can be found in the Greenhouses northeast of the Central Hall. The tree is located on the ground floor of the easternmost greenhouse, accessible through a door.
Bell Tower Wing: Bloody Meat

At first glance, this sight might seem alarming, but it is simply used to feed the Thestrals. You can find it outside the Bell Tower Courtyard after learning the Alohomora spell to unlock doors.

Head to the west edge of the Bell Tower Courtyard, near the main ramparts gate, where you'll find a stable on the left housing a few Thestrals. Nearby, there is a level 1 locked door. Unlock it with Alohomora, and inside, you'll discover the Field Guide Page among some bloody meat.
Bell Tower Wing: Caged Bathtub

This bathtub, kept behind lock and key for as long as anyone can remember, is located along the rampart wall outside the Quidditch Pitch, just past the Bell Tower Courtyard. Although it’s technically outside the grounds, you can still access it to find the Field Guide Page.

To locate the bathtub, you can either fly over from the Beasts Classroom on your broomstick and land on top of the ramparts, or head west across the Bell Tower Courtyard toward the rampart wall. Follow the wall south until you are nearly parallel to the Beasts Classroom, where you’ll find a ramp leading up to the ramparts. Look for a tower door you can enter to access a prison area, which contains the hidden Field Guide Page inside.

Bell Tower Wing: Glumbumbles
Glumbumbles are magical flying insects known for producing a treacle that induces melancholy when consumed. To find their nests, head out to the Hogwarts Grounds after your first trip to Hogsmeade. Exit through the Bell Tower Courtyard, then proceed east through a small archway that leads you toward the outside of the Greenhouses.

After passing the moving dragon topiary, continue until you reach a smaller arch located beyond a fountain. Turn left at this arch to discover the hives, where you will find the Field Guide Page.
Bell Tower Wing: Castle Ramparts

These defensive ramparts, fortified with powerful protective enchantments, have protected Hogwarts castle for centuries. After your first visit to Hogsmeade, you can find this page by exiting through the main doors from the Bell Tower Courtyard Floo Flame. Look to your right to see the stone ramparts, and locate a small building along the walls that you can enter. Inside, you’ll discover the Field Guide Page.
Bell Tower Wing: Hogwarts Owls
The Hogwarts Owlery is home to school owls as well as those belonging to students. It’s wise to explore the area carefully, as you may encounter owl droppings and the remains of regurgitated mouse skeletons scattered about.

This Field Guide Page can be found far beyond the Bell Tower Wing, yet it remains categorized within this area. To reach it, exit the grounds and courtyard, then head south from the Beasts Classroom hut. Follow the winding trail leading up to the isolated tower perched on the edge of the Hogwarts grounds.

Upon entering, ascend the long staircase that leads to the main platform of the Owlery. Once you reach the top, cast Revelio to reveal the Field Guide Page hidden within the space.
Bell Tower Wing: Quidditch Pitch
The Hogwarts Quidditch Pitch is known for hosting fierce house rivalries, with Chasers, Beaters, Keepers, and Seekers competing fiercely for the Quidditch Cup. To find this Field Guide Page, you'll need to wait until you're permitted to explore outside the castle after your first visit to Hogsmeade. Begin your journey by exiting the Bell Tower Courtyard and passing through the large rampart gates to the West. Once you’re on the road, turn left to head toward the Quidditch arena.
Continue moving to the Southwest, staying along the outer side of the ramparts that surround the Quidditch arena. Look for a small, collapsed section of the wall, where you’ll find the hidden Field Guide Page waiting for you.
Library Annex: Statue of Gregory the Smarmy

This statue, featuring an ingratiating grin, represents Gregory the Smarmy, the inventor of the Unctuous Unction potion. You can find it located at the Southwestern entrance to the Central Hall, positioned just to the right of the staircase leading up to the main fountain, right next to the Potions Classroom Floo Flame.
South Wing: Unicorn Fountain
The majestic unicorn fountain brings a sense of serenity and calm to the hospital wing at Hogwarts. You can find it at the top of the Faculty Tower, right next to the Hospital Wing Floo Flame. However, to access this area, you'll first need to unlock the Alohomora spell, which you can obtain after completing The First Trial quest, allowing you to bypass locked doors.

After completing Mr. Moon's quest and gaining access to the Faculty Tower, ascend to the very top of the staircase until you reach the Hospital Wing Floo Flame. Once there, cast Revelio on the nearby statue to reveal its hidden secrets.
Grand Staircase: Hufflepuff Barrels

To access the Hufflepuff common room, you must tap the barrels in the rhythm of Helga Hufflepuff. If you didn’t select this house, you can locate it by traveling to the Grand Staircase Floo Flame and turning around to head east down a leafy spiral staircase into the cellar. The barrels are situated in the alcove at the very back.
Great Hall: Kitchen Tables

In the Hogwarts Kitchen, the prepared food placed on these tables is magically transferred to the Great Hall tables directly above. You can find this hidden Field Guide Page in the kitchen, located in the cellar beneath the Great Hall. To access it, take the small staircase by the Grand Staircase Floo Flame.

To access the Hogwarts Kitchen, tickle the Pear Painting by the entrance to the cellar to reveal the secret door. Once inside, head to the middle of the hall filled with tables to find and reveal the Field Guide Page.
Great Hall: Pear Portrait
Tickling the pear in this still-life painting of a bowl of fruit will cause it to giggle and transform into a doorknob, granting access to the Hogwarts Kitchen. If you chose Hufflepuff as your house, this will be the first Field Guide Page you obtain with Professor Weasley. For those who didn’t, you can find it by going to the Grand Staircase Floo Flame, turning around, and heading east down a leafy spiral staircase into the cellar, where the portrait is located at the entrance.

Cast Revelio on the painting to reveal the Pear Portrait Field Guide Page. Nearby, you’ll also find other Field Guide Pages that are easily accessible by opening the passage behind the painting, so be sure to take advantage of this opportunity to collect them.
Great Hall: House-Elf Living Quarters
Ever practical and creative, the Hogwarts house-elves have crafted a cozy, village-like home for themselves among the barrels in the Hogwarts Kitchen. To find this hidden Field Guide Page, head to the Hogwarts Kitchen, located in the cellar below the Great Hall. Access it via the small staircase near the Grand Staircase Floo Flame.

Tickle the Pear Painting located by the entrance to the cellar to uncover the secret door to the kitchen. Once inside, head to the back of the room to reveal the Field Guide Page.
Grand Staircase: House-Elf Recipe Book

This book, believed to house some of Helga Hufflepuff’s original recipes, features a compilation of students' favorite dishes. You can find it halfway down the leafy, circular staircase leading to the Hufflepuff Common Room, situated just behind the Grand Staircase Floo Flame, accompanied by an assortment of edible food items.
Bell Tower Wing: The Old Librarian

This large portrait depicts one of the first librarians of Hogwarts. To locate this Field Guide Page, enter the Library from the Central Hall to the west and take the spiral staircases up to the second floor. The portrait is displayed prominently there, contributing to the rich history of the Hogwarts Library Annex.
Library Annex: Enchanted Books

These mischievous books are best avoided due to their ability to fly from one's hands and the lack of valuable content within them. You can find this Field Guide Page on the bottom floor of the Restricted Section of the Library, which you'll gain access to during a main quest involving Sebastian Sallow. Once you sneak past two ghosts and reach the bottom floor, cast **Revelio** in the first room to reveal the page and learn more about these troublesome tomes.
Library Annex: Palmistry Model
This standing model of a hand is designed to assist students in practicing palmistry. You can find it in the middle of the Divination Classroom, which is located at the top of a spiral staircase. To access this classroom, head up the staircase that begins near the Astronomy Wing, and once you arrive, look for the model in the center of the room to reveal the associated Field Guide Page.

To find the standing model of a hand for practicing palmistry, start from the Viaduct Entrance of the Library Annex. Travel up the spiral staircase located on the north side. Continue ascending the stairs past the Floo Flame, and as you approach the top, a rung ladder will descend. Climb the ladder to reach the Divination Classroom. Inside, you'll find the model of the hand in the center of the room, which will reveal the Field Guide Page when you cast Revelio`56=.
Library Annex: Book on Intermediate Transfiguration

During Professor Weasley's Assignment, you need to collect two Field Guide Pages. The second one is located in the Library and pertains to the Book on Intermediate Transfiguration. This page isn't counted among the Hogwarts 150. To begin, head to the Library and go upstairs. You'll notice that the book is missing from its pedestal. Talk to Sophronia Franklin, who will agree to give you the book if you complete a trivia challenge for her.

Here are the correct answers to Sophronia Franklin's trivia questions:
Before the invention of the Golden Snitch, which magical creature was used in a game of Quidditch? The Golden Snidget
Which potion is commonly referred to as 'Liquid Luck'? Felix Felicis
The Tale of the Three Brothers involves which magical artefacts? The Deathly Hallows
Which ball in Quidditch is the largest? The Quaffle
Polyjuice Potion allows the drinker to change species? False

Answer the trivia questions correctly to convince Sophronia to return the book. Once you've answered, be sure to cast Revelio to reveal the Field Guide Page. After that, you can continue with your quest!
Astronomy Wing: Alchemy Class

Alchemy is a specialized subject available to advanced students at Hogwarts, taught infrequently based on demand. It explores the four natural elements and the principles of transmutation. To find the last Field Guide Page related to Alchemy, you must access it from the Bell Tower Wing. However, you can only reach it after providing enough Demiguise Moons to Groundskeeper Moon to unlock the Level 2 Alohomora spell.

After acquiring the Level 2 Alohomora spell, proceed south from the Bell Tower Courtyard Floo Flame and descend the North Hall stairs into the dungeons. Continue down the hallway until you reach a Level 2 locked door adorned with cauldrons. Once you unlock it, you'll discover the Field Guide Page at the entrance to the Alchemy classroom. Be sure to grab the Wand Handle Cosmetic located on the right side as well!
Bell Tower Wing: Important Muggle Artefact

This often-misunderstood artifact is believed to hold significance in Muggle warfare, although most witches and wizards find the idea of wielding such a cumbersome weapon quite perplexing. To locate this Field Guide Page, head down into the Dungeons beneath the North Hall. Before you can do this, however, you'll need to learn the Alohomora unlocking spell from Groundskeeper Moon, who will instruct you once you complete The First Trial.

Once you've acquired the ability to unlock doors, make your way through the North Hall, located south of the Bell Tower Floo Flame, and descend the stairs into the dungeons. Look for two locked doors: one on the left resembling a drawbridge with a level 1 lock. After bypassing this door, enter the Muggle Studies Classroom. Inside, cast Revelio near the giant cannon to uncover a Field Guide Page.
Bell Tower Wing: Sleeping Dragon Statue

This stone sleeping dragon statue is permanently dormant, despite the Hogwarts motto advising against tickling a sleeping dragon. You can find it in the dungeons beneath the Bell Tower Wing, located below the Urn of Ashes. To reach the statue, head south from the Bell Tower Courtyard Floo Flame and descend the stairs in the North Hall.
Bell Tower Wing: Sphinx Statue
The sphinx, a creature with the head of a human and the body of a lion, has long been used to guard treasures and secrets due to its intelligence and skill in puzzles and riddles. You can find this statue in the Hieroglyphic Hall, located beyond the North Hall in the Bell Tower Wing. However, you must first learn the Alohomora spell from Groundskeeper Moon, who will teach it to you after you complete The First Trial.

After learning the Alohomora spell, proceed through the North Hall, located south of the Bell Tower Floo Flame. Unlock the door to the History of Magic classroom to enter the hall where the Sphinx statue can be found.
Bell Tower Wing: Werewolf Saga Tapestries
To find the Field Guide Page depicting the tapestries that recount the tragic story of a witch bitten by a werewolf, head south from the Bell Tower Courtyard Floo Flame and descend the stairs in the North Hall. The page is located in the dungeons beneath the Bell Tower Wing, where it can be somewhat hidden.

Upon entering the dungeons, proceed straight ahead until you reach the large tapestry featuring the letter "K." Walk into it to reveal a hidden door, and step inside the spacious room beyond, which is adorned with additional tapestries. There, you will discover the Field Guide Page you seek.
South Wing: Fat Lady Portrait

This portrait serves as the guardian of the Gryffindor common room and demands a password from anyone wishing to gain entry. If you did not select Gryffindor as your house, the simplest way to reach the portrait is by traveling to the Faculty Tower Floo Flame located in the South Wing. From there, head south to ascend the spiral staircase, then continue down the hall to the west.
Grand Staircase: Ravenclaw Bust

This bust, commemorating Ravenclaw house, is located in the elevated Ravenclaw Tower. If you selected Ravenclaw as your house, this will be the first Field Guide Page you collect with Professor Weasley. For those in other houses, simply head west from the Ravenclaw Tower Floo Flame and ascend the small spiral staircase. You'll spot the bust halfway up, on the wall before reaching the entrance to the Common Room.
Grand Staircase: Ravenclaw Doorknocker

To access the Ravenclaw common room, you'll need to solve a riddle presented by the door. Begin your journey by heading west from the Ravenclaw Tower Floo Flame and ascend the small spiral staircase. Continue upward until you reach a grand ornate door that leads into the tower.
Great Hall Field: Deathday Party Room

The door to the Deathday Party Room is prominently displayed within the Slytherin Dungeons, located just a short distance from the Detention Chamber. To access it, you’ll need the appropriate unlocking spell.

When you’re ready to return, begin at the Lower Grand Staircase. Descend the stairs and navigate through the lengthy passage, taking a left at the end. Use Alohomora (Level 1) to unlock the iron gate blocking the passage. Continue through the dark corridor until you reach the dimly lit Deathday Party Room, aglow with ghostly blue light from magical candles.

The dim, expansive chamber in the lower dungeons of Hogwarts serves as a unique venue for the Deathday parties hosted by the castle's ghosts, and it hides three Field Guide Pages within its shadows. To uncover the first page, cast Revelio near the two low tables along the East wall.
Grand Staircase: Kelpie Statue

This statue represents the Kelpie, a shape-shifting water demon found in Ireland and Great Britain, often taking the appearance of a long-maned horse. If you selected Slytherin as your house, this will be the first Field Guide Page you collect with Professor Weasley. For those who chose a different house, locate it by starting at the Lower Grand Staircase Floo Flame, descending the stairs to the North, and then heading West to climb back up to the statue.
Great Hall: Slytherin's Sink

Scratched into one of the copper taps on the sink in the girls’ toilet is a small snake. To find this, head down the stairs from the Lower Grand Staircase Floo Flame, proceed through the long passage East until you reach a set of bathroom doors, and enter the one marked with the profile of a witch. Inspect the sink directly in front of you. In the Transfiguration Courtyard, a fountain featuring the likeness of a wyvern serves as a gathering spot for students. You can find it in the center of the Transfiguration Courtyard at the base of the Astronomy Tower, close to the Transfiguration Floo Flame.
Astronomy Wing: Wyvern Fountain

This fountain, featuring a wyvern atop, is a popular gathering place for students in the Transfiguration Courtyard. To find it, head to the center of the Transfiguration Courtyard at the base of the Astronomy Tower, where it's conveniently located near the Transfiguration Floo Flame.
Great Hall: Detention Chamber

This chamber was once the preferred location for punishing students, and while physical torture is no longer practiced, the unsettling aura of its past remains. To acquire the Field Guide Page, you must first unlock the second level of the Alohomora spell by collecting enough Demiguise Moons. Once you have this ability, head to the Slytherin Dungeons by either going down from the Lower Grand Staircase Floo Flame or entering through the Entrance Hall from the Great Hall. Proceed past the Slytherin bathrooms into a hallway lined with several locked doors, one of which requires a level 2 lock to open.

Upon unlocking the door, you will discover a spacious detention room that contains the Field Guide Page in the center, which can be revealed using Revelio.
Great Hall: Headless Hunt Tapestry

In the Deathday Party Room, you can find a third Field Guide Page concealed behind the tapestry on the west wall, situated behind the ghostly orchestra. Make sure to cast Revelio to reveal the page once you approach the tapestry.

To complete the "hattrick" in the Deathday Party Room, cast Revelio near the tapestry on the west wall behind the ghostly orchestra.
Astronomy Wing: Pungent Passage
This passage may seem unremarkable at first glance, but its history is anything but ordinary. In the sixteenth century, a careless mishandling of a crop of Mimbulus mimbletonia resulted in a massive release of Stinksap, leaving the passage permeated with an unpleasant stench that even the most potent Scouring Charm cannot remove.

Although it is technically situated off the Astronomy Tower, this location is accessed via the passage leading to the West Tower. To reach it, head to the second floor of the Defence Against the Dark Arts Tower and proceed west toward the exit that leads to the Beasts Classroom.
Library Annex: Portrait of Sir Cadogan

Sir Cadogan, who was supposedly friends with Merlin and a Knight of the Round Table, is known for challenging students to duels. You can locate his portrait on the second-floor walkway of the Viaduct Entrance in the Library Annex. To reach it quickly, climb the stairs from the Central Hall Floo Flame and head east toward the Viaduct Entrance.
Clagmar Coast, Highlands and Hogwarts Valley
South Hogwarts Grounds: Groundskeeper’s Tools

One might speculate that this collection of tools is enchanted to conjure various furnishings for a cozy hut, adapting to the occupant's needs regardless of their size.

You can locate this Field Guide Page just outside Hogwarts, a short distance from the Clock Tower Entrance. Cross the long bridge towards the South Hogwarts Exit Floo Flame and look down the road to the south. You should see a small shack near the water in the distance. Head over to the shack and enter to find the page inside.
South Hogwarts Grounds: Spider Parts
It appears that someone has taken to collecting Acromantula parts for profit. This could be quite a lucrative venture, provided one is willing to risk their life to gather the necessary inventory.

You can find this Field Guide Page at the small hamlet of Aranshire, located just east across the Black Lake from Hogwarts Castle. In the village square, look for a stall shopkeeper named Edgar Adley. Inspect the large cage next to his shop to discover the Field Guide Page.
Hogwarts Valley: Beehives

Honey is essential in the wizarding world, just as it is for Muggles, particularly for sweetening tea and other delightful concoctions.

In the hamlet of Keenbridge, located in the lower central Hogwarts Valley, you can find one of three Field Guide Pages south of the Keenbridge Floo Flame. Look for a cluster of large conical beehives near the river, just across from the building where the Ginger Roots page is located.
Cragcroftshire: Giant Shade Tree

This beautiful tree provides a home for numerous Bowtruckles, fairies, and possibly even an Augurey or two. It is also cherished by many for the shade it offers on warm days.

You can locate this Field Guide page in the central hamlet of Cragcroft, situated in Cragcroftshire. The prominent giant tree that towers in the middle of the town, positioned far to the east, is impossible to overlook, and the page can be found at its base.
Feldcroft Region: Broken Binoculars

These damaged binoculars were abandoned by Muggles who were trying to observe what they thought was a peculiar bear, but it was likely a Demiguise instead.

You can find this Field Guide Page atop the large gatehouse ruins in the upper central Feldcroft area, directly north of Feldcroft village. It's situated near an Ancient Magic Hotspot, above a grand gate where a traveling merchant named Priya Treadwell offers her goods.
South Sea Bog: Abandoned Bothy

This dilapidated old bothy once provided shelter for traveling witches and wizards seeking refuge from harsh weather. However, as time has passed, the encroaching bog has gradually reclaimed the structure, leaving it in a state of disrepair.

This Field Guide Page is concealed in the expansive bog located south of the Northern South Sea Bog Floo Flame. To find it, follow the footpath south from the bridge where the traveling merchant Priya Treadwell sells her wares. Look for an old, sinking shack to discover the Field Guide Page just outside.
Feldcroft Region: Cinnamon Bark

You can find this Field Guide Page at a goblin encampment located in the southern part of the Feldcroft Region. Look for a cooking area within the camp where a pot is hanging over a fire, and inspect the ingredients nearby to reveal the page.

This Field Guide Page is well-hidden beneath a rock overhang that forms part of a medium-sized bandit camp with multiple levels. To find it, start from the Feldcroft Catacomb Floo Flame and fly southeast along the coastline. As you curve around, look to the north to spot the goblin encampment tucked under the rocky cliff. The page is located within the camp, where platforms extend both above and below the rock outcropping.

As you approach the goblin camp under the rock outcropping, descend to the lowest level where you'll find a large brick oven furnace area. The Field Guide Page is located near the furnace, but be prepared to face off against goblins guarding the spot.
Coastal Cavern: Antique Compass

Regrettably, the fact that this old Muggle compass was left behind suggests that the Muggle who lost it is likely wandering somewhere in Wales by now.

Although it's categorized as a Coastal Cavern collectible, you can actually find this Field Guide Page by navigating through the goblin-fortified coastal cave to its southern exit. The page is situated on a balcony near the North Poidsear Coast Floo Flame, with a view overlooking the vast southern region. Since flying through the cave isn’t an option, you'll need to either battle your way through the large camp or sneak past it, then exit via the southern tunnel.
Hogwarts Valley: Lace Doily

According to the locals, this doily was left as a tribute to a beloved house-elf who once dreamed of wearing it someday.

This Field Guide Page is concealed behind the ruins of an old house, located up the hill directly west of the hamlet of Keenbridge. The area serves as an Ancient Magic Hotspot, and behind the ruined home, you’ll find a gravestone resting at the base of a tree.
Hogwarts Valley: Doxy Egg

These black eggs, stolen by poachers for use in potions, come from a Doxy—a magical creature often mistaken for a fairy.

This Field Guide Page is located in a small Bandit Camp nestled in the hills in the southwest corner of the Hogwarts Valley, between the Keenbridge and Northern South Sea Bog Floo Flames. To reach it, follow the paths heading west and north from the South Sea Bog. You'll come across two small bandit camps in the area; the northern camp contains the Field Guide Page inside a large open tent.
Feldcroft Region: Practice Dummies

The residents of Feldcroft often use these for practicing their spell-casting, particularly due to the recent goblin attacks.

One of two Field Guide Pages in this town, the practice dummies are located just east of the town square near the water well. Follow the road leading out of town, and you'll find a row of dummies to the left of the path as it descends toward a bridge.
North Hogwarts: Alihotsy Fudge

This fudge, made from the leaves of the Alihotsy tree, is a delicious treat known for inducing uncontrollable laughter.

You can find this Field Guide Page resting on a bench with a wide view of Hogwarts from the north. It's situated on a large bluff overlooking red-brick ruins you pass along the road to Hogsmeade. The location is just northeast of the Forbidden Forest Floo Flame.
Hogwarts Valley: Ginger Root

The barkeep in Keenbridge keeps a supply of ginger root on hand to ward off his customers' nausea, helping them stay and drink a little longer.

One of three Field Guide Pages in the hamlet of Keenbridge, located in lower central Hogwarts Valley, this page is found just to the right of the Keenbridge Floo Flame. Look for it at an open bar counter next to the nearby building.
Hogwarts Valley: Hebridean Black Scale

The Hebridean Black Scale comes from a large dragon that can grow over nine meters in length. This rough, sizable scale from one of these majestic creatures is a prized possession kept in this hideout.

Archie Bickle's tent hideout is located in a small clearing south of Lower Hogsfield, just off one of the main paths leading into the valley. To find the Field Guide Page, look for a rundown tent scattered with debris and a large skeleton nearby.
South Hogwarts Grounds: Hogsmeade Station Ticket Office

This station has been here since the early 1800s, when the Minister for Magic introduced a steam engine to transport students to Hogwarts. The station appeared in Hogsmeade almost overnight, shortly after the arrival of the train.

This Field Guide Page is located in a small, unnamed hamlet north of the bridge between Aranshire and Hogsmeade, easily accessed by following the train tracks. At the station, you'll find a sign for a ticket office on the east side of the platform. Use Revelio to reveal the Field Guide Page.
North Ford Bog: Antique Horn

This oddly-shaped horn was used centuries ago by a Muggle boatman to deter monsters in the water while travelers crossed by boat. Naturally, it was ineffective, as no magical water beast could be repelled by a mere horn.

You can find this Field Guide Page in the far northeastern part of the Bog, on the right side of the watery area inhabited by numerous Duggbogs and a few poachers. Look for a small dock northeast of a Battle Arena and a Giant Purple Toad Den to locate the horn at the water's edge.
Feldcroft Region: Jewelled Brooch

The beautiful brooch features a depiction of a magical bird, though its exact identity remains uncertain. Some believe it symbolizes one of the legendary birds of the medieval Irish druidess Cliodna, known for singing the sick to sleep.

You can locate this Field Guide Page in the hamlet of Irondale, situated on the lower southeast side of the Hogwarts Valley, bordering the South Sea Bog. It is easily found at Irondale's main landmark: the giant windmill on the east side of the hamlet, which is impossible to miss.
Feldcroft Region: Lovage Bouquet

This memorial stands as a somber reminder of the power of magical beasts. Years ago, a young witch was tragically killed by a Graphorn in this very spot while she awaited her true love.

This easily overlooked Field Guide Page is found in a lower alcove along the coastline, south of the main Feldcroft Village. As you head south, look for a small path that leads down to the coastal area. You’ll discover a hidden nook along the rock walls, moving southwest toward the water, where the shrine is situated.
Hogwarts Valley: Murtlap Tentacles

Murtlap tentacles are a rare potion ingredient prized for their ability to enhance resistance against certain Dark Arts charms while also possessing healing properties.

You can locate this small container near a cluster of standing rocks, a spot where wizards often gather to paint a floating portrait of Hogwarts Castle across the lake. To find it, head west from the Central Hogwarts Valley Floo Flame along the river's edge. Look for a clearing among some flat rocks on the west side of the river, where the tiny vial will be resting on the ground.
Clagmar Coast: Pungous Onion Bulb

The Pungous Onion is a notably potent ingredient utilized in various potions, including the Cure for Boils. Due to its strong properties, it's advisable to avoid handling it with bare hands, as its effects can be quite overwhelming. This magical vegetable is often found in enchanted gardens or potion shops, and it adds a unique element to potion-making, enhancing their efficacy while also requiring caution during its use.

This Field Guide Page can be discovered on a lower path that descends toward the southwestern beaches of Clagmar Coast. To find it, head south from the previous Field Guide Page location. Look for an incline that leads down past a small bandit camp situated on a hill. As you make your way toward the shoreline, keep an eye out for a broken stall and scattered supplies along the path. The Field Guide Page will be nestled among the ruins, waiting to be collected.
Feldcroft Region: Peruvian Instant Darkness Powder

This magical substance, when thrown into the air, envelops the area in a thick darkness that is resistant to most light-creation spells, making it particularly useful for stealth and escape.

This Field Guide page is located on a bluff overlooking the West Hogwarts Valley Floo Flame, positioned on the northeastern side of a Medium Bandit Camp that straddles the Feldcroft and Hogwarts Valley areas. Search for a collection of tents near the ruins of an old building wall to discover the darkness powder.
Hogsmeade Valley: Pumpkin Fizz

Pumpkin Fizz is a trendy carbonated beverage infused with a delightful pumpkin flavor. While it hasn't quite reached the same level of popularity as Butterbeer, its potential remains to be seen.

You can find this Field Guide page in the hamlet of Upper Hogsfield, located north of Hogsmeade Village at the northern edge of the region. Once inside the hamlet, head to the largest building on the north side, which features barrels of butterbeer and signage. Look for a small front desk in an open room on the left side, where the Field Guide page is tucked away.
Hogsmeade Valley: Squib Cottage

This charming country cottage is home to an elderly Squib who opted to embrace life in the wizarding world instead of attempting to blend in with Muggles, as some Squibs choose to do.

This spacious cottage is located in a field due east of Hogsmeade Village, just south of the East Hogsmeade Valley Floo Flame. Once you spot it from the air, check the southern side of the cottage using Revelio to uncover the Field Guide Page, or you can enter the cottage to loot some items.
Hogsmeade Valley: Runespoor Egg

Runespoor eggs, which are produced by the three-headed snake, are renowned for their ability to enhance mental agility, making them a popular ingredient in various potions.

This Field Guide Page is unique in the Highlands, as it requires you to progress through a specific main quest to access it. It is situated deep behind Falbarton Castle, located on the far eastern edge of Hogsmeade Valley. You won't be able to access or fly over the castle until you complete the quest "The High Keep," which is assigned by Natty during the fall season of the story, following your First Trial.

After completing this quest, return to the castle, and you'll be able to fly over its gates, allowing you to confront the enemies and Infamous Foe on the opposite side. If you descend into the ruined building located in the far northeastern corner, you'll discover the Field Guide Page beside a chest.
Hogwarts Valley: Enchanted Scarecrow

This playful scarecrow, originally enchanted to protect the garden from crows, now spends its time taunting gardeners with insults as they tend to their plants.

This Field Guide Page can be located in the hamlet of Brocburrow, situated high above the valley on the upper east side of the region, east of the Central Hogwarts Valley Floo Flame. From the town center, head west past the Merlin Trial, and look for a small garden nestled between two houses at the edge of the hamlet, where you’ll find the scarecrow.
Cragcroftshire: Dragon Skeleton

This dragon skeleton might have been here for many years, or it could be a sign of recent poaching activity. Exercise caution when approaching.

You can locate this Field Guide Page along the southern coastline of Cragcroftshire, situated on a sandy shore southwest of the hamlet of Cragcroft. It's found at the base of the large bluffs, right on the edge of a vast bay and the bridge leading to the Clagmar Coast. Search for a massive skeleton partially buried among the sand dunes to discover the page.
North Ford Bog: Spider Sign

Clearly, a spider infestation has rendered this area especially perilous. It raises the question of how many other locations might benefit from a warning sign like this.

This Field Guide Page can be located in the town of Pitt-Upon-Ford, situated in the central northern part of the region, just below the prominent San Barkar's Tower. Once you arrive in the hamlet, look for the sign—and the corresponding page—positioned in front of the southern bridge that crosses the river flowing through the town. You'll find it just south of the merchant Indirra Wolff.
Hogwarts Valley: The Tilted House

The locals refer to this as the Tilted House because of its peculiar angle, as it is ensnared in the roots of a sprawling overhanging tree.
This is one of the three Field Guide Pages located in the hamlet of Keenbridge, situated in the lower central part of Hogwarts Valley. You'll find this particular page to the west of the Keenbridge Floo Flame, right at the front door of a house shaded by a large, drooping tree.
Clagmar Coast: Acromantula Venom

This venom, secreted from the pincers of the carnivorous Acromantula, is both highly valuable and highly toxic.

You can find this Field Guide Page tucked away in a medium-sized bandit camp situated on one of the high peaks in the northern region of the Clagmar Coast. To locate the camp, head to the highest cliffs to the left of the bridge and ruins that connect to Cragcroftshire. Once you arrive at the bandit camp, look for a wooden balcony on its highest platform, where you'll find the Field Guide Page near a large tent on a table of supplies.
Feldcroft Region: The Feldcroft Well

The well in Feldcroft ran dry approximately four hundred years ago due to a severe drought. Tragically, this led to numerous fatalities, including at least one young boy, whose father remained silent for many years afterward as a result of the loss.

This Field Guide Page is one of two found in the central area of Feldcroft, a small town along the western coastline. You can easily locate it in the heart of the hamlet, where the well is prominently situated.


Comments